HTML5 Web存储方式的localStorage和sessionStorage进行数据本地存储案例应用_HTML5教程
推荐:Bootstrap 学习分享
Bootstrap 是由Twitter 工程师推出的基于HTML,CSS,JAVASCRIPT的简洁灵活的流行前端框架
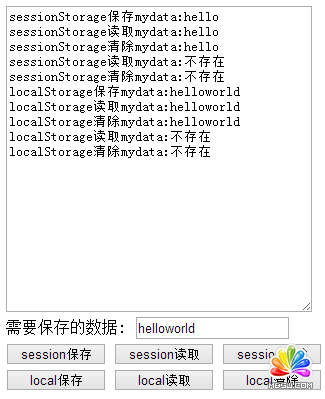
使用HTML5 Web存储的localStorage和sessionStorage方式进行Web页面数据本地存储。
页面参考如下图,能将页面上的数据进行本地存储。并能读取存储的数据显示在页面上。
localStorage(本地存储),可以长期存储数据,没有时间限制,一天,一年,两年甚至更长,数据都可以使用。
sessionStorage(会话存储),只有在浏览器被关闭之前使用,创建另一个页面时同意可以使用,关闭浏览器之后数据就会消失。
某个博主的测试localStorage兼容情况,如下:
Chrome4+ 开始支持localStorage
Firefox3.5+开始支持localStorage
Firefox1.5+支持globalStorage
IE8+支持localStorage
IE7兼容模式支持localStorage
IE5.5+支持userdata
Safari 4+ 支持localStorage
Opera10.5+支持localStorage

复制代码 代码如下:www.mb5u.com
<!DOCTYPE html>
<html xmlns="http://www.w3.org/1999/xhtml">
<head>
<meta http-equiv="Content-Type" content="text/html; charset=utf-8" />
<title></title>
<style type="text/css">
textarea {
width: 300px;
height: 300px;
}
.button {
width: 100px;
}
</style>
</head>
<body>
<script type="text/javascript">
//使用HTML5 Web存储的localStorage和sessionStorage方式进行Web页面数据本地存储。
//页面参考如下图,能将页面上的数据进行本地存储。并能读取存储的数据显示在页面上。
function saveSession() {
var t1 = document.getElementById("t1");
var t2 = document.getElementById("t2");
var mydata = t2.value;
var oStorage = window.sessionStorage;
oStorage.mydata = mydata;
t1.value += "sessionStorage保存mydata:" + mydata + "\n";
}
function readSession() {
var t1 = document.getElementById("t1");
var oStorage = window.sessionStorage;
var mydata = "不存在";
if (oStorage.mydata) {
mydata = oStorage.mydata;
}
t1.value += "sessionStorage读取mydata:" + mydata + "\n";
}
function cleanSession() {
var t1 = document.getElementById("t1");
var oStorage = window.sessionStorage;
var mydata = "不存在";
if (oStorage.mydata) {
mydata = oStorage.mydata;
}
oStorage.removeItem("mydata");
t1.value += "sessionStorage清除mydata:" + mydata + "\n";
}
function saveStorage() {
var t1 = document.getElementById("t1");
var t2 = document.getElementById("t2");
var mydata = t2.value;
var oStorage = window.localStorage;
oStorage.mydata = mydata;
t1.value += "localStorage保存mydata:" + mydata + "\n";
}
function readStorage() {
var t1 = document.getElementById("t1");
var oStorage = window.localStorage;
var mydata = "不存在";
if (oStorage.mydata) {
mydata = oStorage.mydata;
}
t1.value += "localStorage读取mydata:" + mydata + "\n";
}
function cleanStorage() {
var t1 = document.getElementById("t1");
var oStorage = window.localStorage;
var mydata = "不存在";
if (oStorage.mydata) {
mydata = oStorage.mydata;
}
oStorage.removeItem("mydata");
t1.value += "localStorage清除mydata:" + mydata + "\n";
}
</script>
<div>
<textarea id="t1"></textarea>
<label>需要保存的数据: </label>
<input type="text" id="t2" />
<input type="button" class="button" onclick="saveSession()" name="b1" value="session保存" />
<input type="button" class="button" onclick="readSession()" value="session读取" />
<input type="button" class="button" onclick="cleanSession()" value="session清除" />
<input type="button" class="button" onclick="saveStorage()" value="local保存" />
<input type="button" class="button" onclick="readStorage()" value="local读取" />
<input type="button" class="button" onclick="cleanStorage()" value="local清除" />
</div>
</body>
</html>
分享:input元素的url类型和email类型简介
在过去我们制作网页输入框,会用到不少JS验证,如今有了HTML5写这种效果已经没有那么麻烦了,下面我来给大家介绍两种HTML5的input的新增加的类型应用。
 评论加载中....
相关HTML5教程:
- 只要五步 就可以用HTML5/CSS3快速制作便签贴特效(图)
- 网易微博Web App用HTML5开发的过程介绍
- HTML5 对各个标签的定义与规定:body的介绍
- 关于HTML5的安全问题开发人员需要牢记的
- 关于HTML5的22个初级技巧(图文教程)
- 开发人员所需要知道的HTML5性能分析面面观
- HTML5 Web Database 数据库的SQL语句的使用方法
- HTML5实践-图片设置成灰度图
- HTML5安全介绍之内容安全策略(CSP)简介
- Bootstrap 学习分享
- input元素的url类型和email类型简介
- HTML5自定义data-* data(obj)属性和jquery的data()方法的使用
HTML5教程Rss订阅Div+Css教程搜索
HTML5教程推荐
- html5 Canvas画图教程(7)—canvas里画曲线之quadraticCurveTo方法
- html5中canvas学习笔记1-画板的尺寸与实际显示尺寸
- 突破canvas语法限制 让他支持链式语法
- HTML5之SVG 2D入门9—蒙板及mask元素介绍与应用
- HTML5之SVG 2D入门8—文档结构及相关元素总结
- 在html5的Canvas上绘制椭圆的几种方法总结
- HTML5之WebGL 3D概述(下)—借助类库开发及框架介绍
- HTML5 Canvas像素处理使用接口介绍
- html5 canvas里绘制椭圆并保持线条粗细均匀的技巧
- html5 canvas-1.canvas介绍(hello canvas)
- 相关链接:
复制本页链接| 搜索HTML5 Web存储方式的localStorage和sessionStorage进行数据本地存储案例应用
- 教程说明:
HTML5教程-HTML5 Web存储方式的localStorage和sessionStorage进行数据本地存储案例应用
 。
。

 聚设
聚设 AI小聚 能写会画
 域名
域名