
 AI闂佽绻愮换鎰崲濡や胶顩烽柨鐕傛嫹 闂備胶鍘ч悿鍥涢崟顖氱柈闁圭偓娼欓杈ㄦ叏濡潡鍝洪柡鍡嫹
 闂備胶纭堕弲婵嬪窗鎼淬劌绠栭柨鐕傛嫹
 闂備浇顫夋禍浠嬪礉韫囨挾鏆﹂柨鐕傛嫹
MAYA银版教程_Maya视频教程
视频Tag:暂无Tag,欢迎添加,赚取U币!
缂傚倸鍊风粈浣该洪敃鍌氱劵缂佲偓閹辩eCMS闂佽崵鍠愰悷銉ノ涘┑瀣ㄢ偓鍌炲醇閺囩偞鐎┑鐐叉閸ㄧ喖寮婚敓锟�濠电偞鍨跺瑙勭珶閸℃稑鐓橀柡宥庡幗閳锋帡鏌ㄩ悤鍌涘 缂傚倷绀侀ˇ閬嶅窗閹邦剨鑰块柛銉墮缁€澶愭煃閵夈劍鐝柣婵撴嫹 闂傚倷绶¢崑鍕囨潏鈺冪濠㈣泛鏈崗婊堟煛閸ャ劍鐨戦梻澶婄Ч閺屻倖娼忛妸锔绘缂備焦鍞婚幏锟� 闂備礁鎼崯鐗堟叏閹绢喖妞介柡宥庡亞閸楁碍绻涢崱妯诲鞍婵絾鍔楅埀顒冾潐閹爼宕曢柆宥呯煑闁跨噦鎷�,闂備浇鐨崟顐㈠Б闁诲氦顫夋繛濠傤嚕閸洖绀冩い鏂垮悑椤忕喐绻涢幋鐐村皑闁稿鎹囧鍝勨枎閹勭亪闂佸憡鐟ョ换妯侯嚕婵犳碍鏅搁柨鐕傛嫹!
此教程来源于9iv.
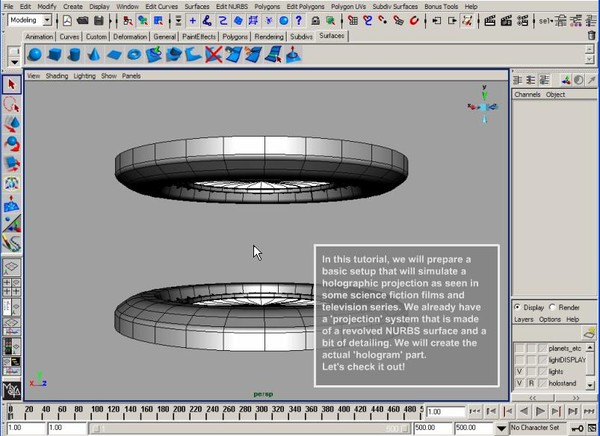
MAYA银版教程,swf格式,本期教程主要讲解全息图显示(HOLOGRAM DISPLAY)的制作。
通过本教程的学习,你将清楚在计算机上是怎样完成像科幻小说那些奇幻的炫丽场景。
3张CD的教程里你将完整的学习到从建模、材质到动画内容,教学采用高质量截屏,swf格式。
Contents:
CD1:
INTRODUCTION
No doubt you have seen the flashy, futuristic effects on popular
Science-Fiction television series or Blockbuster films.
Now you can create your own hologram generator and hologram projections
using just a simple scene setup.
STEP 1
We will start by creating some of the shapes that will make up
the hologram display. We will be primarily using NURBS spheres and cylinders
and then detaching the surfaces to create the desired shapes.
STEP 2
After the shapes have been created, we will examine the tessellation
settings and correct them accordingly for improved rendering results.
hen we will proceed with creating the outlines of the shapes by extracting
curve information from the surfaces. We will take these curves and attach
Paint Effects glow strokes to simulate the laser/neon light-up effect
of a holographic display.
STEP 3
We will re-examine the curves created from the surfaces and correct
any anomalies that have occurred. Then we will re-attach the Paint Effects
neon glow stroke to the curve. The surfaces created in Part 1 will then be
deleted and we will activate a layer with previously made surfaces
that will simulate some of the holographic projections.
STEP 4
We will apply the same techniques covered earlier when applying Paint Effects
brush strokes to the curves from these surfaces.
CONCLUSION
You may be accustomed to seeing these holographic displays project flying,
random information and visuals - these effects are composited afterwards.
We will be covering the actual 3D construction aspect of it. Stay tuned
next time when we apply textures to the surfaces and create additional
geometry for the holographic projections.
CD2:
INTRODUCTION
This is the part-two continuation of the Light-up Hologram Display tutorial.
In it, we will create and apply shaders that will mimic the look of
a holographic image from the surfaces we created previously.
STEP 1
Using lambert shaders, we will turn the surfaces into transparent and
glowing 'light displays'. We will also use the Sampler Info utility to
alter translucency values of the surfaces depending on the angle
view of camera.
STEP 2
We will add additional geometry to the 'hologram display'.
STEP 3
We will add additional geometry to the 'hologram display'.
CONCLUSION
Stay tuned next time when we texture the rest of the hologram display
in preparation for the animation!
CD3:
INTRODUCTION
This is the last installment of the Light-up Hologram Display tutorial.
We will be animating the geometries in the scene to simulate a moving hologram projection image and creating shaders for the remaining surfaces inside the s
STEP 1
Let's check the movements of the moonpath/rings around the planets.
STEP 2
We will prepare shaders for the hologram planets. Thanks to J.H.T.'s
Planetary Pixel Emporium [http://gw.marketingden.com/planets/sun.html]
for the images to texture the planets with!
STEP 3
We will create glowing, colourful procedural shaders for the moonpath/rings.
STEP 4
We will create glowing, colourful procedural shaders for the moonpath/rings.
STEP 5
We will create a shader for the giant ring around the hologram.
STEP 6
Now we will prepare the scene and animate the moonpath/rings.
STEP 7
We will animate the moonpath/rings.
STEP 8
We will prepare the giant ring for rendering and animating.
STEP 9
We will finish animating the giant ring and render out to see the
final results. In addition, we will throw in two lights
to brighten up the scene.
STEP 10
As a final touch, we will create a 'laser scan' on the main planet using
a curve-on-surface and a neon Paint Effects brush.
CONCLUSION
Now you probably have an idea how those cool computer displays that
light up neon bright are done in movies. You now have the know-how
to make your own sci-fi flicks! - at the very least...
the bright and moving displays on computer consoles.
[已通过安全检测]SYMANTEC.ANTIVIRUS.CORPORATE.V10.0.
[已通过安装测试] win xp
共享服务时间:8:00-12:00
共享服务器:DonkeyServer No1-3 . DonkeyServer No5
鈽夋帹鑽愪娇鐢ㄨ繀闆锋垨蹇溅绛夊绾跨▼涓嬭浇杞欢涓嬭浇鏈珯璧勬簮銆�
鈽夋湭鐧诲綍浼氬憳鏃犳硶涓嬭浇锛岀櫥褰曞悗鍙幏寰楁洿澶氫究鍒╁姛鑳斤紝濡傛湭娉ㄥ唽锛岃鍏�娉ㄥ唽銆�
鈽夊鏋滄湇鍔″櫒鏆備笉鑳戒笅杞借绋嶅悗閲嶈瘯锛佹€绘槸涓嶈兘涓嬭浇锛岃鐐规垜鎶ラ敊,璋㈣阿鍚堜綔锛�
鈽夋湰绔欐墍鏈夎祫婧愶紙鍖呮嫭妯℃澘銆佺礌鏉愩€佽蒋浠躲€佸瓧浣撶瓑锛変粎渚涘涔犱笌鍙傝€冿紝璇峰嬁鐢ㄤ簬鍟嗕笟鐢ㄩ€斻€�
鈽夊鏈夊叾浠栭棶棰橈紝璇峰姞鏃犲咖缃戠珯璁捐浜ゆ祦缇�(29061111)杩涜浜ゆ祦銆�
鈽変汉姘戝竵涓嶶B姹囩巼涓�1姣�100,鍗�1鍏�=100UB.鏈変换浣曠枒闂鑱旂郴瀹㈡湇锛�
鈽夋湭鐧诲綍浼氬憳鏃犳硶涓嬭浇锛岀櫥褰曞悗鍙幏寰楁洿澶氫究鍒╁姛鑳斤紝濡傛湭娉ㄥ唽锛岃鍏�娉ㄥ唽銆�
鈽夊鏋滄湇鍔″櫒鏆備笉鑳戒笅杞借绋嶅悗閲嶈瘯锛佹€绘槸涓嶈兘涓嬭浇锛岃鐐规垜鎶ラ敊,璋㈣阿鍚堜綔锛�
鈽夋湰绔欐墍鏈夎祫婧愶紙鍖呮嫭妯℃澘銆佺礌鏉愩€佽蒋浠躲€佸瓧浣撶瓑锛変粎渚涘涔犱笌鍙傝€冿紝璇峰嬁鐢ㄤ簬鍟嗕笟鐢ㄩ€斻€�
鈽夊鏈夊叾浠栭棶棰橈紝璇峰姞鏃犲咖缃戠珯璁捐浜ゆ祦缇�(29061111)杩涜浜ゆ祦銆�
鈽変汉姘戝竵涓嶶B姹囩巼涓�1姣�100,鍗�1鍏�=100UB.鏈変换浣曠枒闂鑱旂郴瀹㈡湇锛�
相关Maya视频教程:
- 相关链接:
- 模板说明:
Maya视频教程-MAYA银版教程
 。
。